As an Amazon Associate, we earn from qualifying purchases. Some links may be affiliate links at no extra cost to you. Although our opinions are based on curated research, we haven't used these products. Articles generated with AI.
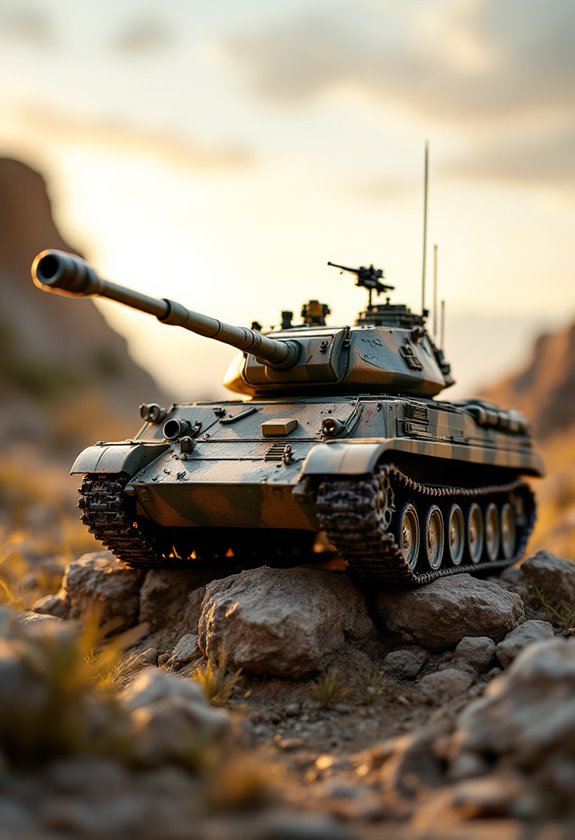
RC Tank Painting Masterclass: From Primer To Pigments
RC tank painting is an exciting and rewarding process that blends artistry with craftsmanship. It begins with selecting the right supplies, like acrylics and enamel paints, for durability and ease of application. The correct primer, such as gray for flaw visibility, sets a solid foundation. After preparing the tank surface, techniques like layering base coats and enhancing details with washes and pigments provide depth and realism. With keen attention to each step, creators achieve stunning results that captivate. There’s much more to explore in this art form.
Key Takeaways
- Start with proper surface preparation by washing, sanding, and cleaning to ensure optimal adhesion of paint and primer.
- Choose the right primer for your model; select industrial-grade and appropriate colors to enhance paint adhesion and visibility.
- Apply base coats in thin, even layers using airbrush or long strokes with brushes for a smooth and professional finish.
- Enhance details by using washes to create depth and pigments to add realistic weathering effects on surfaces.
- Protect your finished work with varnish and store with high-density foam to safeguard the painted tank during storage.
Essential Supplies for RC Tank Painting
You may be interested

Accessory Review: Dual 20w Speakers And Enclosures
November 22, 2025

Adding Crew Figures And Stowage For Authentic Looks
November 22, 2025

Are RC Tanks Safe For Kids? Age Ratings And Supervision
November 22, 2025
When starting on an RC tank painting project, having the right supplies is crucial for achieving impressive results. Selecting the ideal paint type, such as easy-to-use acrylics or durable enamel paints, can make a significant difference in your final look. It’s important to gather essential cleaning tools like cotton swabs and isopropyl alcohol to guarantee surfaces are free from dust and fingerprints before applying paint. Additionally, incorporating paint additives, such as thinners or washes, can enhance your work’s depth and detail. A variety of brushes is needed: fine detail brushes for intricate areas and larger brushes for broad surfaces. Together, these supplies create the foundation for any enthusiast aiming to transform their RC tank into a true masterpiece. Consider using high-density foam for packaging to protect your painted tank during storage and transport.
Recommended Products

Made by Tamiya USA; Tamiya USA is a United States based company; parts are sourced from Global producers

【WWII Allied Forces Paint Set】Nicpro acrylic model paint set designed for WWII Allied Forces military figures, uniforms, crews, field gear, weapons, vehicles and battlefield dioramas. This historically inspired palette helps modelers create realistic military greens, khakis, earth tones, leather details, wood parts, shadows and gunmetal accents.

Weathering Master 6-Set (A, B, C, D, E, F) with Chipping Sponge & Alligator Clip Stickss (12 cm/4.7 inches, Set of 5) This set includes all six varieties of popular Weathering Master palettes, along with a handy chipping sponge and a set of five 12cm alligator clips, perfect for painting.
Choosing the Right Primer for Your Model

Choosing the right primer for an RC tank model is vital for achieving a durable and visually appealing finish. Understanding primer types is significant; for instance, ABS plastics and metals each require specific formulations. Thicker, industrial-grade primers are ideal for 1/16 scale tanks, as they absorb impacts and resist wear. When it comes to color selection, gray primers help spot surface flaws, while white enhances brightness for lighter final paints. Using brands like Rustoleum or Tamiya provides reliable protection and finish. Ultimately, the right primer not only guarantees strong adhesion but also enhances the longevity of the paint job, making it a foundation for successful and satisfying modeling experiences. Embrace your creativity by choosing wisely! Additionally, selecting primers made from high-quality materials can further improve the durability of your paint job.
Recommended Products

1,NEW FUNCTION!!!Infrared combating system supports many players to combat in a tank war

【1/16 Real Scale Simulation Tank Model】The Leopard 2 A6 tank adopts a 1:16 scale design,accurately reproducing the appearance and details of a real tank.The army tank model has nfinitely Variable Speed Forward, infrared battle function, smoke, sound, lights, simulated recoil, firing 6mm bbs, 360 degrees central rotation, turret 320 degrees rotation, muzzle up and down 30 degrees, Sound can be adjusted up, down, and turned off.

9106-S ZD Racing 1/10 4WD Remote Control Monster Truck Electric RC Off Road Vehicle Wheelie Bar Version No Light System 10427-S2
Preparing Your RC Tank for Painting

Preparing an RC tank for painting is an essential step that sets the stage for an impressive finish. The process begins with fundamental surface preparation, which includes cleaning methods like washing plastic and metal components with soapy water to remove any unwanted oils. Following that, sanding the entire surface with fine grit sandpaper creates a textured base for improved paint adherence. After sanding, it’s important to wipe the surfaces with a lint-free cloth and finish with isopropyl alcohol for a clean slate. Disassembling removable parts helps achieve even coverage, while masking protected areas guarantees sharp lines. To ensure optimal durability, it is advisable to select paints formulated for polycarbonate surfaces, which are known for their superior adhesion. Finally, a well-ventilated workspace with controlled dust and temperature assures ideal painting results, allowing hobbyists to create their perfect RC tank masterpiece.
Recommended Products

Ideal for painting work in the field of plastic or RC model making
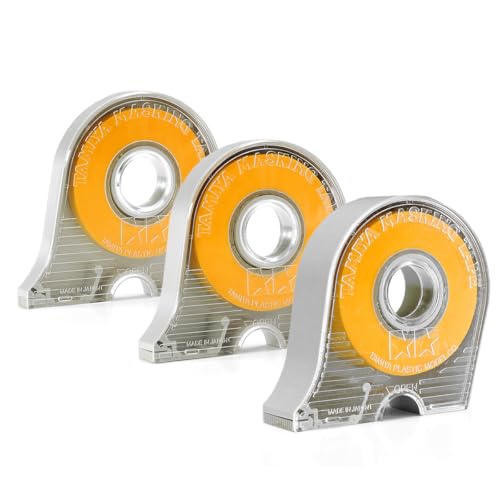
Extremely flexible and strong.

Tamiya 10mm maskingtape with dispenser [87031] and 2pcs refill [87034] set.
Techniques for Applying Base Coats

Applying the base coats is a fundamental stage in transforming an RC tank from a mere assembly of parts into a visually stunning replica. To achieve a beautiful finish, practitioners should embrace layering techniques by applying thin, even coats. Airbrushing is ideal for this, as it creates a smooth application; ensuring the paint is adequately thinned prevents clogging and guarantees precise coverage. Alternatively, brush painting requires long strokes to minimize marks. Color mixing is essential, especially when seeking historical accuracy; for example, using the correct hues like Dunkelgelb for German tanks. By dedicating time to allow each layer to cure and adhering to structured application, enthusiasts foster a mesmerizing look that showcases their commitment to detail. Additionally, considering durable designs can enhance the tank’s overall appearance and ensure it withstands various terrains during gameplay.
Enhancing Details With Washes and Pigments

Enhancing the details of an RC tank with washes and pigments elevates the model from a basic assembly to a stunning, lifelike representation of its real-world counterpart. Wash application involves using thinned paint that seeps into recessed areas, providing depth and highlighting features like weld lines and rivets. To achieve the best results, apply the wash with a brush, allowing it to settle, and then carefully remove excess with a damp brush. Pigment layering adds realism by mimicking dirt and grime, especially in areas like the lower hull and wheels. Dry pigments can be applied for rust effects, while sealing with varnish preserves the look. Together, these techniques blend seamlessly for a visually engaging model. Additionally, understanding the terrain versatility of the tank can help in accurately portraying weathering effects based on its intended environment.
Weathering Techniques for Realism
Weathering techniques play an essential role in bringing realism to RC tanks, transforming them from polished models into believable representations of their battle-scarred counterparts.
To achieve authentic weathering, start with surface preparation: layer steel undercoat, primer, and final color for depth. Use fine brushes or sponges to create chips and scratches, focusing on high-contact areas. For mud effects, mix craft glue with fine dirt, applying layers for realistic texture.
Don’t forget organic integration; add camouflage foliage or equipment to break up uniform surfaces. Use washes and pigments on these elements to blend them with the tank’s aesthetic. Incorporating weathering powders can enhance the overall texture and realism of the model. Whether it’s subtle dust or pronounced chipping, each weathering technique adds a story, making tanks appear more lifelike and well-traveled in their simulated environments.
Ensuring Paint Durability for Active RC Tanks
Securing the durability of paint on active RC tanks is crucial for maintaining their appearance and performance during competitive runs or recreational outings. To achieve ideal paint durability, thorough cleaning of surfaces is essential. Using a compatible quality primer enhances adhesion and prevents chipping, with multiple thin coats yielding better results than one thick application.
Applying three layers—base metallic, primer, and color coat—improves adhesion. Airbrush techniques contribute to even paint distribution, while clear gloss topcoats protect against UV damage. Additionally, treating metal tracks with protective coatings maintains wear resistance. Finally, sealing pigments with topcoats guarantees they remain intact during handling. With these techniques, enthusiasts can enjoy both stunning aesthetics and reliable performance in their beloved RC tanks.
Recommended Products

NON-YELLOWING FINISH SPRAY PAINT – Krylon COLORmaxx Acrylic Clear Spray Paint provides premium adhesion, durability and a non-yellowing, flat finish. It can be used on wood, metal, wicker, most plastics, glass, plaster/ceramic, fabric, paper and more.

DURABLE, FAST DRYING ACRYLIC FORMULA: Delivers a long-lasting, attractive finish on indoor and outdoor surfaces including metal, wood, plastic and more

Maximum resistance to abrasion and scratching
Frequently Asked Questions
How Do I Choose the Right Paint Colors for My Tank?
Choosing the right paint colors involves understanding color theory and historical camouflage patterns. Authenticity can be achieved by selecting shades suited to the tank’s era and using reputable sources to guarantee community acceptance and belonging.
Can I Use Spray Paint Indoors Safely?
Using spray paint indoors requires strict adherence to ventilation and safety precautions. Proper airflow minimizes harmful vapors, while protective gear is essential. Without these measures, the risks of exposure may compromise health and safety considerably.
What Is the Best Way to Clean Brushes After Painting?
The best way to clean brushes after painting involves using appropriate solvent options, such as water for acrylics and mineral spirits for oils. Proper brush care guarantees longevity, enhancing the painting experience within a supportive community.
How Can I Fix Paint Runs or Drips?
Like a sculptor refining clay, achieving the right paint consistency is essential. To fix paint runs or drips, employ touch up techniques, sanding gently, or using solvents for a smooth, unified finish that fosters creativity and connection.
Is There a Recommended Time for the Paint to Cure Completely?
The recommended time for paint curing is typically 24 to 48 hours, as complete drying times vary based on environment and paint type. Modelers emphasize patience for best results and to enhance overall finish quality.


